
Here’s my DIY tips for how to set wooden fence posts in concrete. And, how to build a three rail fence.
Set Wooden Fence Posts in Concrete
Hi guys! I’m back with another DIY home maintenance project.
Most of my DIY tutorials are for inside the home. But not today, this one is for the yard. In this tutorial, I have the steps for how to set wooden fence posts in concrete.
Plus, the easy to follow steps for attaching corral boards, to build a three rail fence.
If you’re building a different style of wooden rail fence, you can still use these steps to set your posts. Just make sure that you use the correct spacing between the posts for the type of fence you are building.
I’m Not the Fence Builder Around Here
First, I have to admit, I do a ton of DIY projects around here. But, fence building and repair, like most of the yard work, is handled by my husband. I’m just his second set of hands when he’s attaching the rail (corral) boards.
In the last 8 years, he’s completely replaced all of the fence posts and boards around our 4 acre property. He’s gotten really good at it over the years.
So, I grabbed the camera to record his steps for building a wooden three rail fence when he was finishing up the last section of fence to be replaced in our yard.
You can see the steps in the video below. The written steps are just below that.
Don’t forget to follow me on Instagram for DIY project sneak peeks and quick how-to videos. Now, let’s get to those DIY steps for how to set wooden fence posts in concrete.
Watch this Video to See How To Do It
In just 3 short minutes, I can show you exactly how to set wooden fence posts in concrete and what you’ll need to do this DIY project. If you have any questions, be sure to comment on the video and I’ll try to answer when I can.
What you’ll Need
- Quikrete Fast-Setting Concrete Mix
- Quikrete Gravel – we skip this step, but it does extend the life of the posts
- Pressure Treated 4×4 Fence Posts
- 16′ PT Corral Boards
- 2′ Spirit Level, or longer
- Optional: Plum Line – to keep the posts perfectly straight
- Digging Pole/Bar
- 3 or 3 1/2″ Exterior Wood Screws & Drill
- Black Barn & Fence Paint & Nylon Brush
How to Set Wooden Fence Posts in Concrete
You can see the steps for How to Set Wooden Fence Posts in Concrete in the video above. If any of these steps are confusing. The video might help explain the process better.
Step One
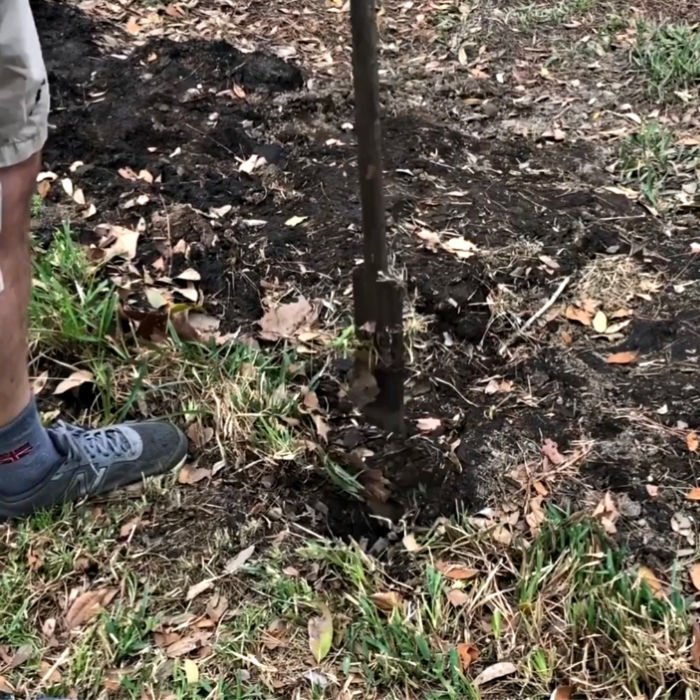
Use a Digging Pole/Bar to remove old posts and/or to dig new holes. Digging bars are heavy enough to break through hard dirt and even the old concrete that holds old posts in place.
You could also use a post hole digger, if you’re only digging new holes and won’t need a tool that can remove old posts too.
Posts for a Three Rail Fence need to be set exactly 8′ apart. The corral boards are sold a few inches longer than 16 feet long. So, setting the posts 8′ apart is important to make sure the boards can span across 3 posts.
Step Two
The fence post hole needs to be 1/3rd to 1/2 the length of the post above ground. If your posts will be 48″ high, after cutting it off, then the hole should be 16″ to 24″ deep. The hole should be 10 to 12″ in diameter for a 4×4 wooden fence post.
Step Three
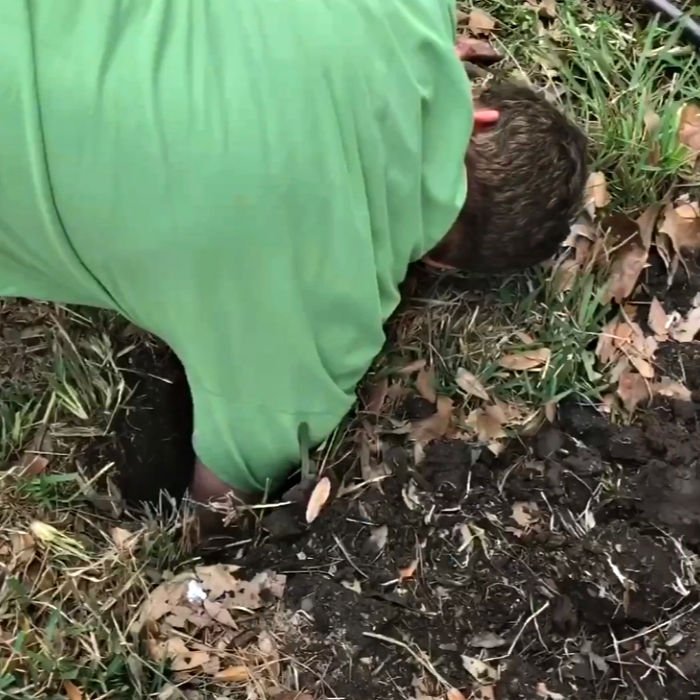
Use the post to stamp the ground down inside the hole down. Then add 6″ of gravel. You can see in the video that we skip the gravel step.
But, gravel is recommended for drainage and will extend the life of that Pressure Treated Fence Post. Then stamp the gravel down. And, leave the post in the hole.

Step Four
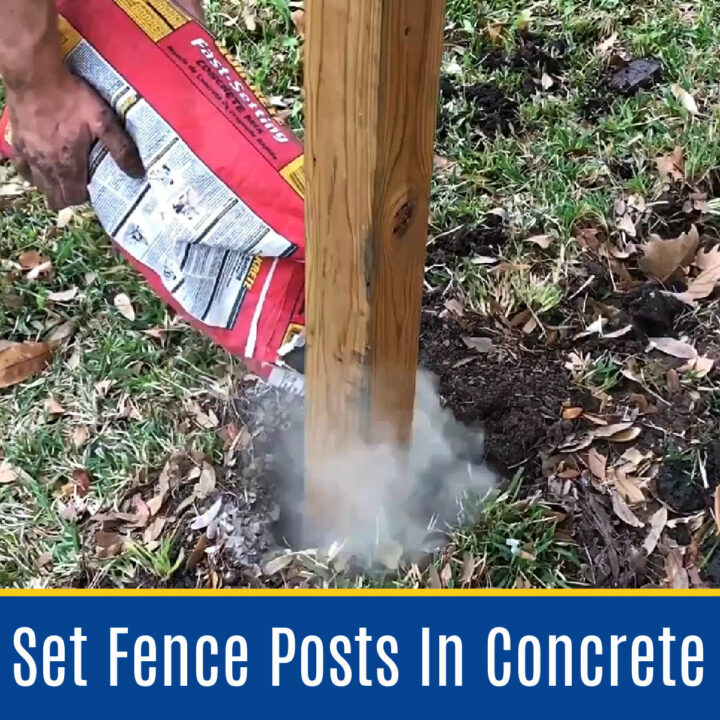
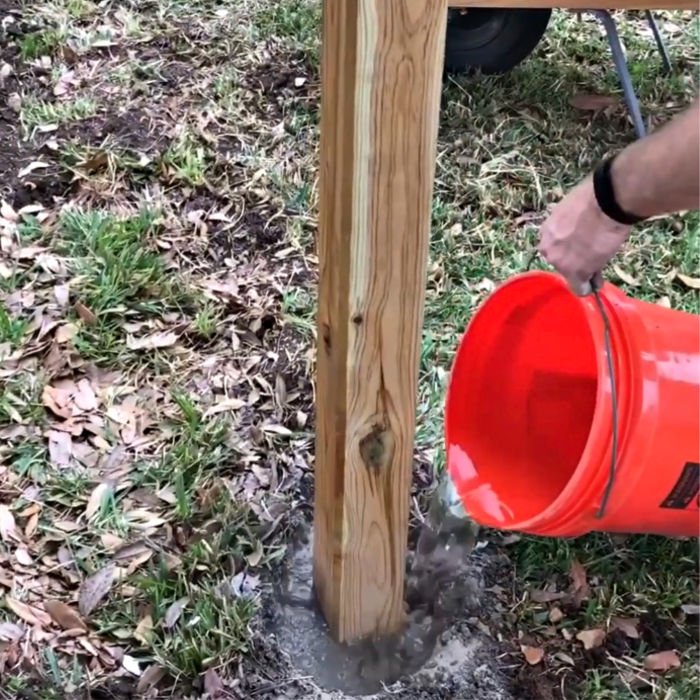
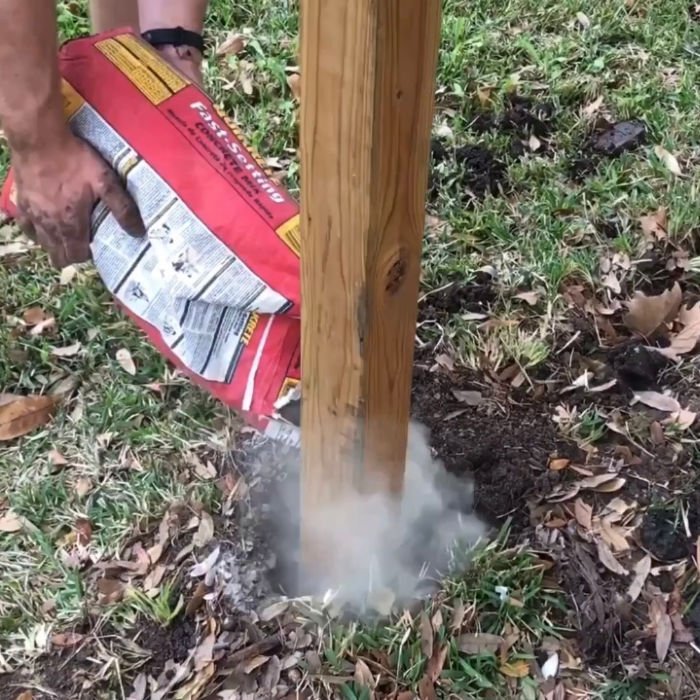
Next, pour the Quikrete Fast-Setting Concrete into the hole, all around the post. Stop filling about 3 to 4″ from the top of the hole.
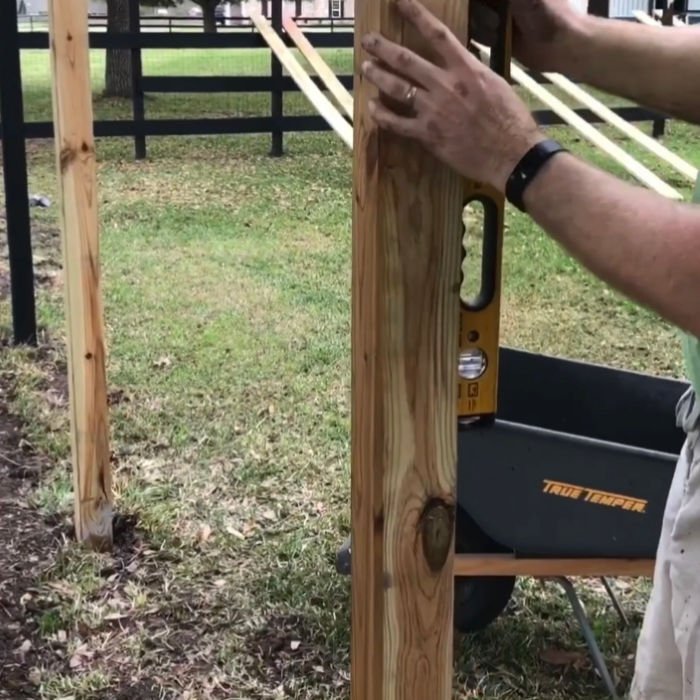
Jiggle the post around to settle the concrete. Then use a spirit level to make sure the post is straight up and down.
You can also tie a plum line along the line of fence posts to keep all of the posts lined up and straight. If you are making all new holes, I really recommend using a line to keep all the posts straight.
Step Five
Add 1 Gallon of water to the hole per 50-lb bag of Fast-Setting Concrete. We generally end up using about 1/2 a bag in each hole, so 1/2 a gallon of water.
This concrete sets hard in 20 to 40 minutes. But, you’ll need to wait 4 hours to attach your rails, or any gates, to the posts.
That’s it for how to set wooden fence posts in concrete. Now, let’s talk about finishing off the fence.
Should Fence Posts be Set in Concrete?
Yes! I think fence posts should be set in concrete. But this is definitely a debated topic. Some people prefer to set fence posts in just dirt and gravel.
I think setting fence posts in concrete is the best way to build a strong, long lasting fence. Soil and/or gravel alone will eventually result in unsupported fence posts that start wearing out the nails or screws that hold the rails to those post.
The more those nail or screw holes breakdown, the more your fence posts will lean. Then, your fence will eventually fall.
Heavy Rains, Drainage or Standing Water Causes Problems
I’ve seen long, long stretches of pretty new fences that weren’t set in concrete that leaned and eventually fell because of heavy rains.
Heavy rains, or even standing water can quickly loosen up the soil and gravel around a fence post, causing a whole stretch of fencing to lean or fall.
Livestock Can Cause Problems
Livestock can also be a problem for fence posts that aren’t set in concrete. My parents’ horses pushed down a long stretch of fence because they constantly leaned on the same spot while they slept.
Donkeys and cows like to lean on fences too. If those posts had been set in concrete that fence wouldn’t have fallen.
Will Wooden Posts Rot in Concrete?
Eventually a wooden posts will rot in concrete because of the water sitting around it. BUT, this will usually take 15 to 20 years if you use pressure-treated lumber.
That’s longer than the same posts would last if just set in dirt and gravel alone!
You’ll also want to keep the concrete a few inches below ground level. Then bury that concrete in the dirt so that water doesn’t cup on top of the concrete. You can see how we do that in the video above.
You should also set the post on a bed of gravel, then pour the concrete around that. Having gravel directly under the post allows for better drainage too.
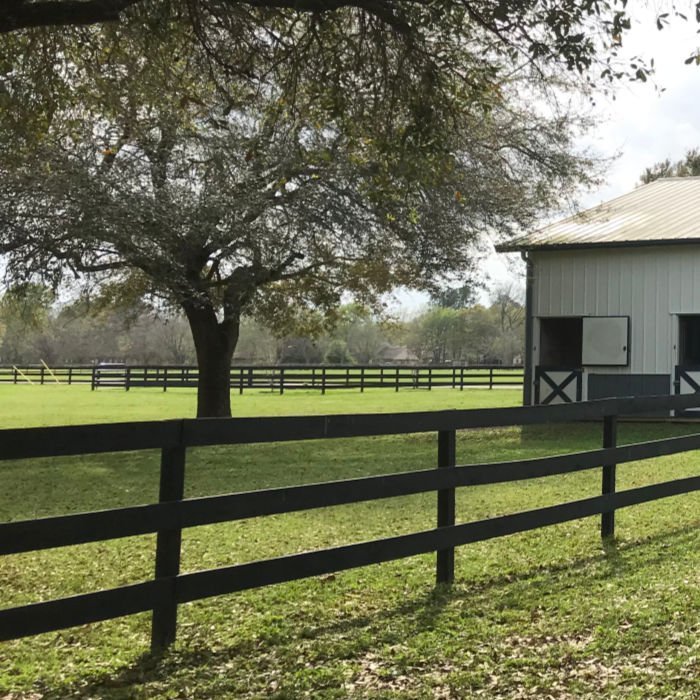
What Is a Three Rail Fence?
A Three Rail Fence is a simple, but classic fence design. It’s three 16′ corral boards stretched across the posts. Our fence rails are spaced about 18″ apart.
Pressure-treated corral boards come a little longer than 16′ long. They will stretch across 3 posts. You want to measure and cut them so that the board begins and ends at the middle of the beginning and ending post.
You also need to stagger the boards to add extra strength to the fence. Make the top and bottom rails begin and end at the same spot, then the middle rail will begin and end 1 post over.
We use 3 1/2″ self-tapping exterior grade screws on our fence. But, exterior nails can also be used. After all of the rails are attached, you can cut the top of the posts off with a chain saw.
You can leave the pressure-treated fence posts and boards to age and weather naturally OR you can paint them with barn and fence paint. Barn and fence paint is made for fences and safe enough to use around livestock.

That’s it for How to Set Wooden Fence Posts in Concrete. I hope you’ve found this helpful. Good luck with your DIY wooden fence!
How to Set Wooden Fence Posts in Concrete
Materials
- Quikrete Gravel
- Pressure Treated 4x4 Fence Posts
- Quikrete Fast-Setting Concrete Mix
Tools
Instructions
Here’s How to Set Wooden Fence Posts in Concrete
You can see the steps for How to Set Wooden Fence Posts in Concrete in the video above. If any of these steps are confusing. The video might help explain the process better.
Step One
- Use a Digging Pole/Bar to remove old posts and/or to dig new holes. Digging bars are heavy enough to break through hard dirt and even the old concrete that holds old posts in place. You could also use a post hole digger, if you’re only digging new holes and won’t need a tool that can remove old posts too.
- Posts for a Three Rail Fence need to be set exactly 8′ apart. The corral boards are sold a few inches longer than 16 feet long. So, setting the posts 8′ apart is important to make sure the boards can span across 3 posts.
Step Two
- The fence post hole needs to be 1/3rd to 1/2 the length of the post above ground. If your posts will be 48″ high, after cutting it off, then the hole should be 16″ to 24″ deep. The hole should be 10 to 12″ in diameter for a 4×4 wooden fence post.
Step Three
- Use the post to stamp the ground down inside the hole down. Then add 6″ of gravel. You can see in the video that we skip the gravel step. But, gravel is recommended for drainage and will extend the life of that Pressure Treated Fence Post. Then stamp the gravel down. And, leave the post in the hole.
Step Four
- Next, pour the Quikrete Fast-Setting Concrete into the hole, all around the post. Stop filling about 3 to 4″ from the top of the hole. Jiggle the post around to settle the concrete. Then use a spirit level to make sure the post is straight up and down.
- You can also tie a plum line along the line of fence posts to keep all of the posts lined up and straight. If you are making all new holes, I really recommend using a line to keep all the posts straight.
Step Five
- Add 1 Gallon of water to the hole per 50-lb bag of Fast-Setting Concrete. We generally end up using about 1/2 a bag in each hole, so 1/2 a gallon of water. This concrete sets hard in 20 to 40 minutes. But, you’ll need to wait 4 hours to attach your rails, or any gates, to the posts.
That’s it for how to set wooden fence posts in concrete. Here's answers to a couple common questions.
Should Fence Posts be Set in Concrete?
Yes! I think fence posts should be set in concrete. But this is definitely a debated topic. Some people prefer to set fence posts in just dirt and gravel.
I think setting fence posts in concrete is the best way to build a strong, long lasting fence. Soil and/or gravel alone will eventually result in unsupported fence posts that start wearing out the nails or screws that hold the rails to those post.
The more those nail or screw holes breakdown, the more your fence posts will lean. Then, your fence will eventually fall.
Heavy Rains, Drainage or Standing Water Causes Problems
I've seen long, long stretches of pretty new fences that weren't set in concrete that leaned and eventually fell because of heavy rains.
Heavy rains, or even standing water can quickly loosen up the soil and gravel around a fence post, causing a whole stretch of fencing to lean or fall.
Livestock Can Cause Problems
Livestock can also be a problem for fence posts that aren't set in concrete. My parents' horses pushed down a long stretch of fence because they constantly leaned on the same spot while they slept.
Donkeys and cows like to lean on fences too. If those posts had been set in concrete that fence wouldn't have fallen.
Will Wooden Posts Rot in Concrete?
Eventually a wooden posts will rot in concrete because of the water sitting around it. BUT, this will usually take 15 to 20 years if you use pressure-treated lumber.
That's longer than the same posts would last if just set in dirt and gravel alone!
You'll also want to keep the concrete a few inches below ground level. Then bury that concrete in the dirt so that water doesn't cup on top of the concrete. You can see how we do that in the video above.
You should also set the post on a bed of gravel, then pour the concrete around that. Having gravel directly under the post allows for better drainage too.
Notes
In this tutorial, I have the steps for how to set wooden fence posts in concrete before attaching corral boards, to build a three rail fence.
If you’re building a different style of wooden rail fence, you can still use these steps to set your posts. Just make sure that you use the correct spacing between the posts for the type of fence you are building.
First, I have to admit, I do a ton of DIY projects around here. But, fence building and repair, like most of the yard work, is handled by my husband. I’m just his second set of hands when he’s attaching the rail (corral) boards.
In the last 8 years, he’s completely replaced all of the fence posts and boards around our 4 acre property. He’s gotten really good at it over the years. So, I grabbed the camera to record his steps for building a wooden three rail fence when he was finishing up the last section of fence to be replaced in our yard.
Looking for more home maintenance projects?? Check out this easy DIY for making that ugly grout look new again.
I love this easy DIY for How to Clean Car Seats At Home.
And, here is the easy to follow DIY Steps to Caulk Along Your Kitchen Counter. 
Check out this post with 20+ Easy DIY Home Maintenance Updates, upgrades, and tips too.

If you’re tired of that crumb-collecting gap under your cabinets. Here’s how to Fill the Gap Between Cabinets and Floor with Caulk.
Feeling inspired? Now that you’ve seen How to Set Wooden Fence Posts in Concrete, you can do it too. Let me know if you have questions. Don’t forget to sign up for the Abbotts At Home email newsletter to get DIY, Remodeling, and Crafty ideas in your inbox.

Stephanie Abbott has been remodeling homes, updating & building furniture, and working on DIY home maintenance and cleaning tips for over 20 years. Her remodeling has been featured in Better Homes and Gardens Magazine. And, her DIY YouTube channel has had more than 8 million views.
Most of the DIY tutorials and videos on this site focus on beginner to intermediate level DIY Projects that can be done in an affordable way without high-end, expensive tools. All of the cleaning tips on this website have been tested in her home.