
Here’s my quick and easy DIY red painted furniture makeover steps – no primer or top coat required. And, this red paint color is A-mazing, right?!
Red Painted Furniture Makeover
I have another easy furniture makeover for you all today. Painting furniture is a fun and easy way to completely change the look of furniture AND the room it’s in.
Especially if you go for a beautiful, unexpected color like this perfect red chalk paint color.
One thing you need to know about red paint is that it always takes more coats than other colors to get full, even coverage.
Whether it’s on walls or furniture red paint usually takes 3 maybe 4 coats. This is true for chalk, latex and acrylic red paints.
So, don’t be surprised when the 2nd coat doesn’t look completely perfect. This red chalk paint makeover will look fantastic after 3 or 4 coats have been applied.
Just be sure to follow the products recommendations for dry time between coats.

Best Red Paint Color for Furniture
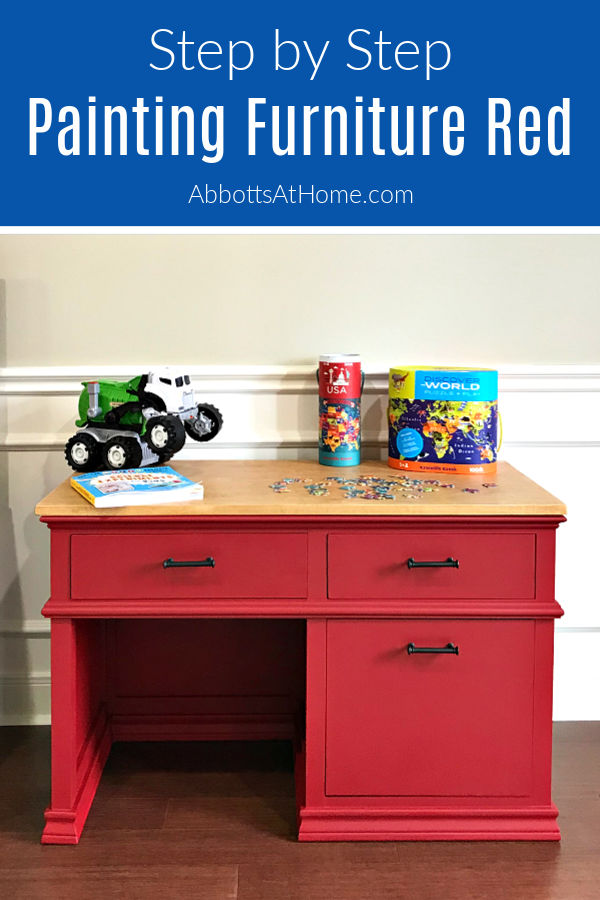
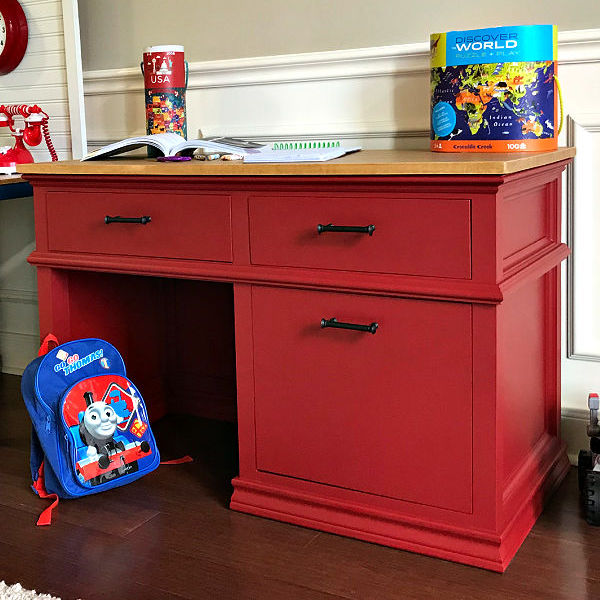
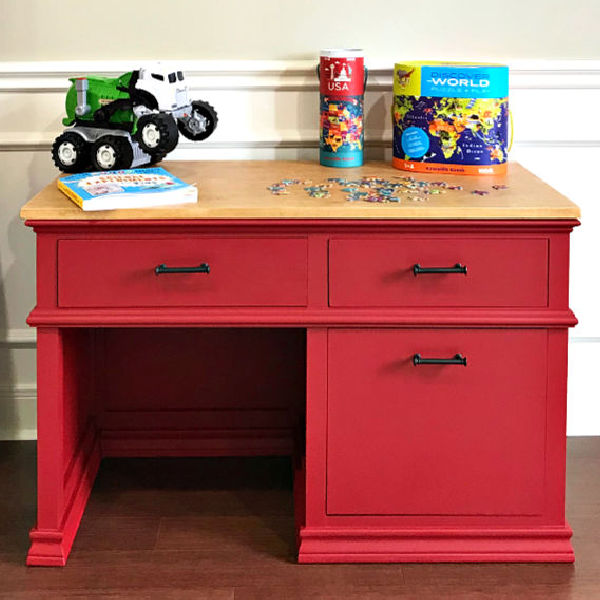
I love this red paint color, guys! You can get it with DecoArt Americana Chalky Finish in Rouge or Country Chic All In One Paint in the color Devotion.
This red color is absolutely as beautiful as it looks in these pictures. It’s that perfect bold red with just a hint of blue that I’ve spent a lifetime looking for in lipstick. 😉
This color reminds me of the red that Pottery Barn uses on furniture. It is a gorgeous color on it’s own. But, it looks fantastic with a dark wax or dark glaze over it too.
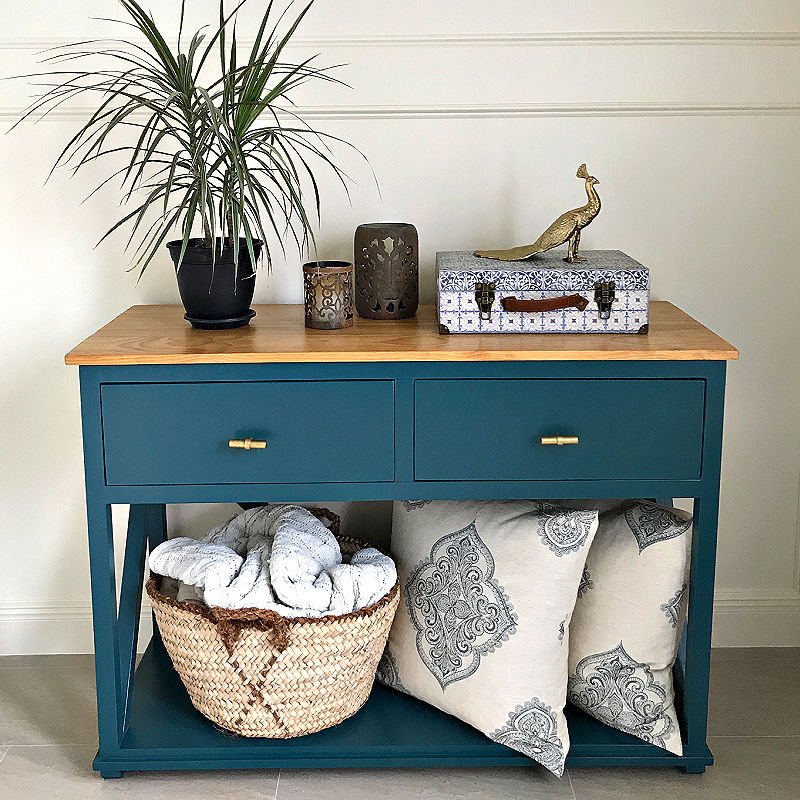
I need to do a tutorial for that Pottery Barn wax on red paint look soon. Until then, you can see how I did dark wax over a beautiful blue chalk paint here.
Other Great Red Paint Colors
This is not that classic barn red that also looks great on furniture. If you want a barn red, I like Rust-Oleums Chalked in Farmhouse Red.
That farmhouse red paint is more of a neutral red, if that makes sense. It’s a red that isn’t too orange, brown, or blue.
Strangely, Dixie Belle paint has a color called Barn Red that I like. But, that one is more like the one I’m sharing today, a great red with a touch of pink or blue.
So, although it is called Barn Red, I don’t really think it looks like the real-life Red Barns I grew up with in Ohio. It’s more of a lipstick barn red.
The Perfect Lipstick Red Paint Color
Anyway, let’s get back to the red paint color I’m using today. This paint is the perfect red in almost any room.
I started out always painting my red furniture and decor with the DecoArt Americana Chalky Finish color Rouge.
Then I found that the Country Chic color Devotion is a pretty close color. And that line of paint is probably better. BUT I love both.
Red is a stand out, bold pop of color. I like to use pops of bold paint colors in rooms with light paint color walls. It really helps the furniture stand out and look great against light walls.
Anyway, lets get to this easy DIY red painted furniture makeover.
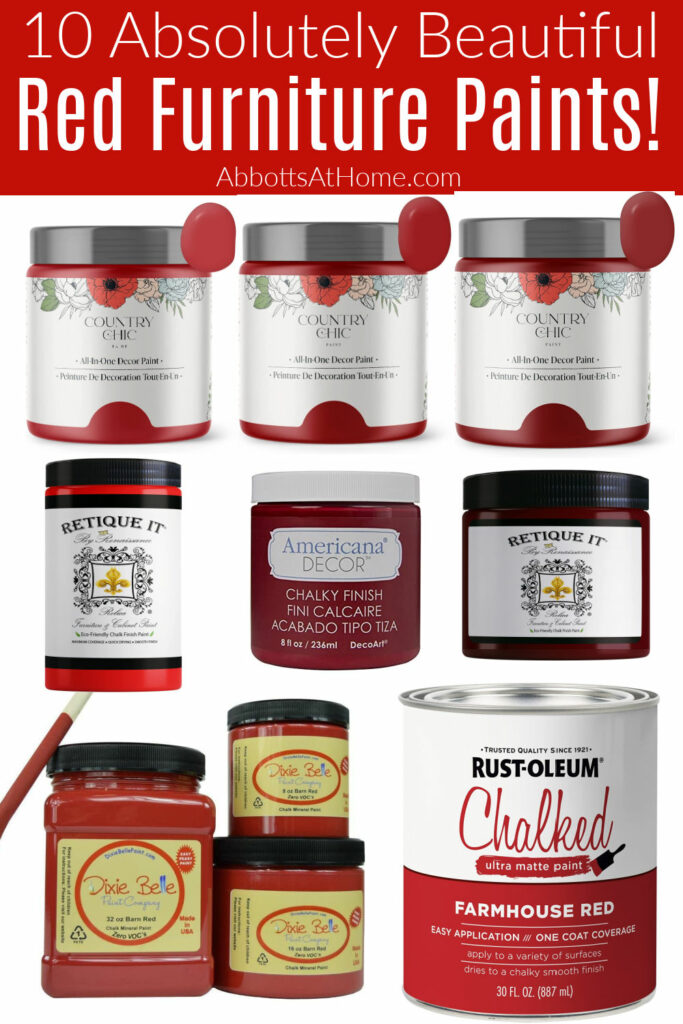
10 Best Red Paint Colors on Furniture
Here’s a quick list of the 5 red furniture paint colors I talked about above. And, 5 more beautiful red chalk paint or chalk-like acrylic paint colors.
- DecoArt Americana Chalky Finish in Rogue
- Country Chic All In One Paint in Devotion
- RustOleums Chalked In Farmhouse Red
- Dixie Belle Barn Red
- Country Chic All In One Paint In Paint The Town
- Country Chic All In One Paint in Cranberry Sauce
- Country Chic All In One In Poppy
- Retique It Chalk Paint in Vermilion
- Shabby Chic Chalked in Nautical Red
- Retique It Chalk Paint in Burgundy
Here’s What You’ll Need
- TSP to clean the furniture
- Optional: Wood Filler or Bondo and Medium Grit Sanding Block
- Fine Grit Sanding Block
- Clean Shop Rag or Tack Cloth
- A Good Nylon Paint Brush
- Red Chalk or Acrylic Paint

How to Paint Furniture Red
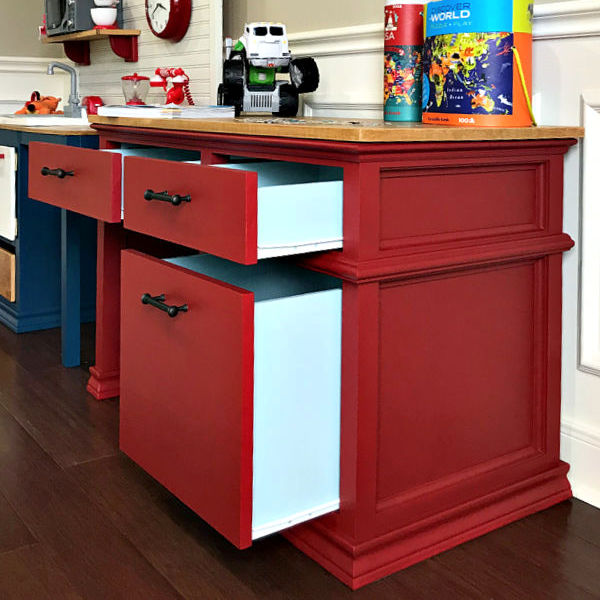
These easy DIY red painted furniture makeover steps will work on almost any unfinished, painted, or stained furniture. This red paint doesn’t require a primer or a top coat. So, it’s a pretty easy DIY, you can finish in a weekend or even a day!
Step One
Prep already painted or stained furniture for painting by cleaning off built up dirt and oils with a degreaser, like TSP. Or a mixture of vinegar and water can remove grease too.
Step Two – Optional, won’t always need to be done.
Repair any little dents and damage with a paintable wood filler. Repair furniture damage with bondo all purpose putty, if the damaged area is bigger than a quarter. Sand the repair smooth with 120 grit sandpaper once the filler is dry.
Step Three
Lightly sand the entire surface of the furniture with a 120 grit sanding block or sandpaper.
If the furniture you are sanding looks great already and has a smooth, chip-free finish, just lightly sand the old finish to make it easier for the paint to stick.
You want to have the surface smooth and looking great before painting. I recommend just hand sanding for this step.
Power sanders on inside corners can sometimes cause damage to furniture. You only really need a power sander on really uneven, chippy old painted surfaces.
You also want to sand new furniture builds or unfinished furniture with 120 grit too.
Be sure to always wear a mask when sanding. And, be careful sanding laminated furniture. Sanding laminated furniture too much can remove the laminate or veneer and you’ll be left with rough plywood or chipboard.
Step Four
Wipe down the furniture with a slightly damp rag or dry tack cloth to remove all dust.
This is one of the most important steps to this easy DIY red painted furniture makeover. It’s easy to do, but if you skip this step your paint will look terrible.

Step Five
Important Note: Most furniture won’t need a primer for this paint. BUT, any furniture that has knotholes, is made of mahogany, has an oil-based finish, and laminate furniture will need a primer. I like this Zinsser 123 Water-Based All Projects Primer. It’s supposed to work on all oil and water-based stains.
Before opening the paint, turn it upside down and shake it for 2 minutes. Then flip it right side up, take off the lid, and stir with a paint stick for 2 minutes.
Apply 2 to 4 coats of the DecoArt Rouge Chalky Finish Paint or Country Chic All In One Paint in Devotion. Follow the directions on the paint container for the best results. You usually only need 2 coats of chalk paint.
But, like I said at the start of this post, red colors need 3 to 4 coats to get a full, even paint color. Follow the directions for dry time so that the paint can cure correctly.
This paint shouldn’t need sanding between coats. But if the finish doesn’t look as smooth as you expected, you can lightly wet sand the last coat to smooth the finish. You can read more about this in how to get a smooth finish with chalk paint.
After wet sanding, lightly wipe down the paint with a clean damp cloth to remove the residue.
Step Six – Optional Step, won’t always need to be done.
A top coat is optional on this paint. If you know that the furniture you’re painting will get a lot of use, I recommend a top coat.
I love the professional looking subtle sheen and durability in General Finishes Flat Out Flat or Minwax Polycrylic in Matte. The sheen in these products looks just like the sheen on expensive furniture from furniture stores.
Again, follow the directions on the product you are using for the best result. That’s it for this easy DIY red painted furniture makeover. Not too hard, right?!
Printable Steps to Paint Your Furniture Red
Here’s an easy to print copy of these furniture painting steps.
Red Painted Furniture Makeover
Quick and easy DIY red painted furniture makeover steps - no primer or top coat required. And, this red paint color is A-mazing!
Materials
- Country Chic Chalk Paint in the color Devotion
- DecoArt Americana Chalky Finish in Rouge
Instructions
Quick Step Guide
- Clean your Furniture.
- Repair any dents and damage.
- Sand smooth.
- Wipe off dust.
- Paint 2 to 3 coats.
- Seal with top coat, if needed.
How to Paint Furniture Red
These easy DIY red painted furniture makeover steps will work on almost any unfinished, painted, or stained furniture. This red paint doesn't require a primer or a top coat. So, it's a pretty easy DIY, you can finish in a weekend or even a day!
Step One
Prep already painted or stained furniture for painting by cleaning off built up dirt and oils with a degreaser, like TSP. Or a mixture of vinegar and water can remove grease too.
Step Two - Optional, won't always need to be done.
Repair any little dents and damage with a paintable wood filler. Repair furniture damage with bondo all purpose putty, if the damaged area is bigger than a quarter. Sand the repair smooth with 120 grit sandpaper once the filler is dry.
Step Three
Lightly sand the entire surface of the furniture with a 120 grit sanding block or sandpaper. If the furniture you are sanding looks great already and has a smooth, chip-free finish, just lightly sand the old finish to make it easier for the paint to stick.
You want to have the surface smooth and looking great before painting. I recommend just hand sanding for this step. Power sanders on inside corners can sometimes cause damage to furniture. You only really need a power sander on really uneven, chippy old painted surfaces.
You also want to sand new furniture builds or unfinished furniture with 120 grit too.
Be sure to always wear a mask when sanding. And, be careful sanding laminated furniture. Sanding laminated furniture too much can remove the laminate or veneer and you'll be left with rough plywood or chipboard.
Step Four
Wipe down the furniture with a slightly damp rag or dry tack cloth to remove all dust. This is one of the most important steps to this easy DIY red painted furniture makeover. It's easy to do, but if you skip this step your paint will look terrible.
Step Five
Important Note: Most furniture won't need a primer for this paint. BUT, any furniture that has knotholes, is made of mahogany, has an oil-based finish, and laminate furniture will need a primer. I like this Zinsser 123 Water-Based All Projects Primer. It's supposed to work on all oil and water-based stains.
Before opening the paint, turn it upside down and shake it for 2 minutes. Then flip it right side up, take off the lid, and stir with a paint stick for 2 minutes.
Apply 2 to 4 coats of the DecoArt Rouge Chalky Finish Paint or Country Chic All In One Paint in Devotion. Follow the directions on the paint container for the best results. You usually only need 2 coats of chalk paint.
But, like I said at the start of this post, red colors need 3 to 4 coats to get a full, even paint color. Follow the directions for dry time so that the paint can cure correctly.
This paint shouldn't need sanding between coats. But if the finish doesn't look as smooth as you expected, you can lightly wet sand the last coat to smooth the finish. You can read more about this in how to get a smooth finish with chalk paint.
After wet sanding, lightly wipe down the paint with a clean damp cloth to remove the residue.
Step Six - Optional Step, won't always need to be done.
A top coat is optional on this paint. If you know that the furniture you're painting will get a lot of use, I recommend a top coat.
I love the professional looking subtle sheen and durability in General Finishes Flat Out Flat or Minwax Polycrylic in Matte. The sheen in these products looks just like the sheen on expensive furniture from furniture stores.
Again, follow the directions on the product you are using for the best result. That's it for this easy DIY red painted furniture makeover. Not too hard, right?!
Notes
Best Red Paint Color for Furniture
I love this red paint color, guys! You can get it with DecoArt Americana Chalky Finish in Rouge or Country Chic All In One Paint in the color Devotion. This red color is absolutely as beautiful as it looks in these pictures. It's that perfect bold red with just a hint of blue that I've spent a lifetime looking for in lipstick. 😉
This color reminds me of the red that Pottery Barn uses on furniture. It is a gorgeous color on it's own. But, it looks fantastic with a dark wax or dark glaze over it too. I need to do a tutorial for that Pottery Barn wax on red look soon.
This is not that classic barn red that also looks great on furniture. If you want a barn red, I like Rust-Oleums Chalked in Farmhouse Red. That farmhouse red paint is more of a neutral red, if that makes sense. It's a red that isn't too orange, brown, or pink.
Strangely, Dixie Belle paint has a color called Barn Red that I like. But, that one is more like the one I'm sharing today, a great red with a touch of pink or blue. So, although it is called Barn Red, I don't really think it looks like the real-life Red Barns I grew up with in Ohio. It's more of a lipstick barn red.
Anyway, let's get back to this red paint color. This paint is the perfect red in almost any room. I started out always painting my red furniture and decor with the DecoArt Americana Chalky Finish color Rouge. Then I found that the Country Chic color Devoltion is a pretty close color. I love both.
Red is a stand out, bold pop of color. I like to use pops of bold paint colors in rooms with light paint color walls. It really helps the furniture stand out and look great against light walls. Anyway, lets get to this easy DIY red painted furniture makeover.
That’s it for this easy DIY red painted furniture makeover. If you love easy furniture makeovers as much as I do, but still have questions about when to sand, prime, paint, and top coat – grab my free guide below.
Grab the 19 page free printable version of my Beginner’s Guide to Painting Furniture that includes everything from this post, plus answers to 12 Common Questions about Painting Furniture.

Looking for more furniture makeover ideas? Check out my DIY Furniture Makeover videos for more furniture painting ideas? You can see them here, on my YouTube channel. 🙂
Here’s another DIY project using that beautiful red! I love this DIY Barn Star Wall Art.

And a beautiful DIY Weathered Paint Effect Tutorial.
New to Furniture Painting? Here’s How to Paint Furniture for Beginners, with everything you need to know to get started.

And, here’s 12 More DIY Tips for Painting Furniture. With answers to common questions about painting furniture.

Check out this 20+ Step by Step Furniture Painting Tutorials for more of my furniture makeovers guides.

Feeling inspired? Now that you’ve seen the Easy DIY Red Painted Furniture Makeover Steps, you can do it too. Let me know if you have questions.
Don’t forget to sign up for the Abbotts At Home email newsletter to get DIY, Remodeling, and Crafty ideas in your inbox.

Stephanie Abbott has been remodeling homes, updating & building furniture, and working on DIY home maintenance and cleaning tips for over 20 years. Her remodeling has been featured in Better Homes and Gardens Magazine. And, her DIY YouTube channel has had more than 8 million views.
Most of the DIY tutorials and videos on this site focus on beginner to intermediate level DIY Projects that can be done in an affordable way without high-end, expensive tools. All of the cleaning tips on this website have been tested in her home.