
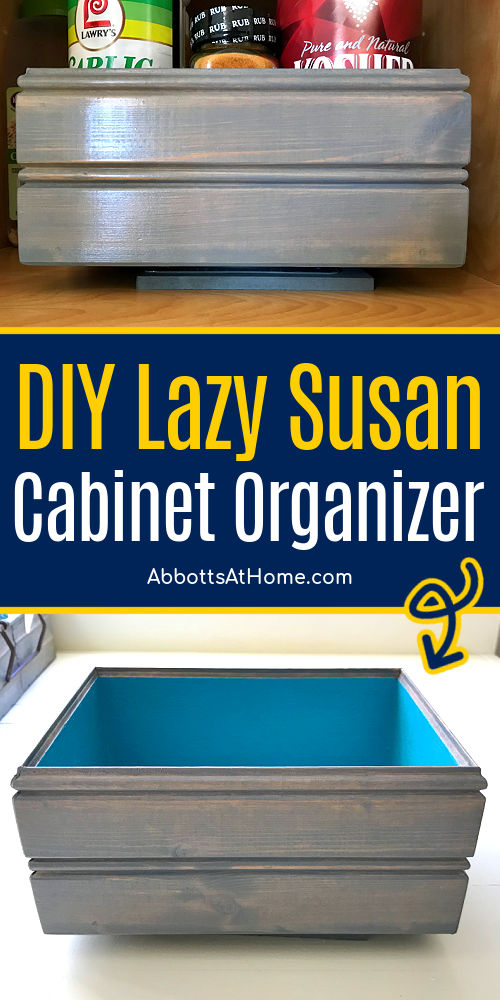
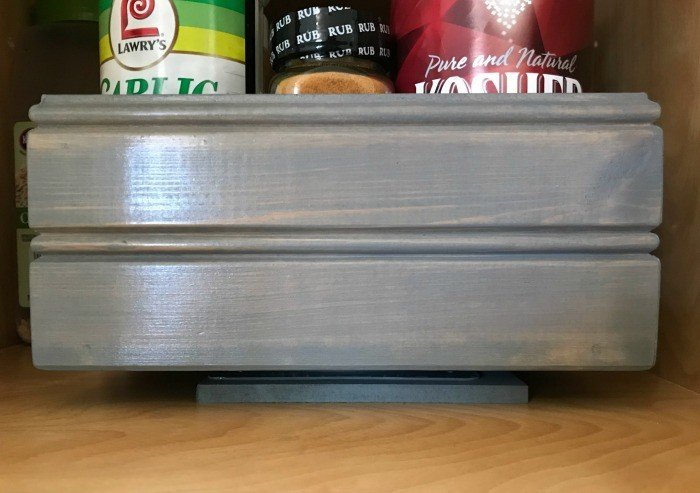
Hi, guys! I’m back with another handy DIY organization idea for you. I made this small DIY lazy Susan spice rack to make it easier to grab my most frequently used spices for a small cabinet in my kitchen.
But you can use these steps to make a DIY lazy Susan organizer to fit any spot in your home. Like your kitchen, bathroom, and home office. And, you can make it square, rectangle, or round to fit your needs.
I have 2 DIY tutorials for you today. And they’re both easy. Yea!!

First, I have the quick and easy steps to build an easy DIY lazy Susan box. Second, a quick tutorial and video to show you how to use Lazy Susan Hardware. OK, it’s time to get organized!
Let’s start with how to build a simple box. Don’t forget, you can also use a pre-made box. If you have a box, skip the steps to build a box. Scroll down to see the steps to add the lazy Susan hardware.
How To Build A DIY Lazy Susan Box
Make your box any size to fit your space. It can be square or rectangle. Just remember that it needs to be able to spin. So, keep that in mind when you pick the size.
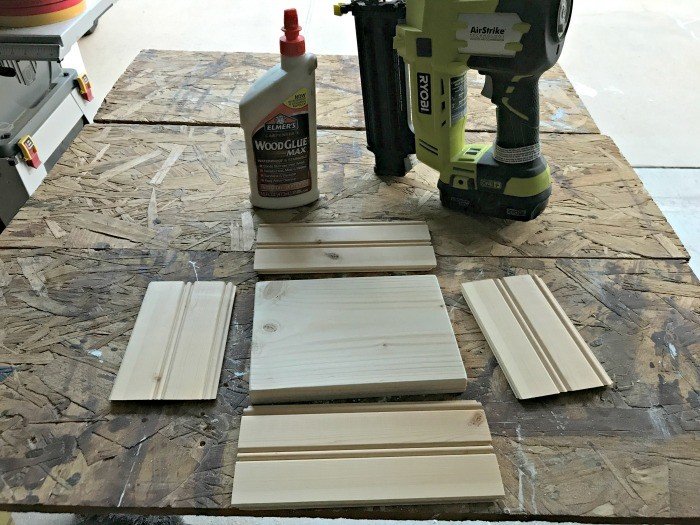
Supplies
Note: Building an open top box is pretty straight-forward. I used leftover beadboard plank from my porch ceiling makeover. But, you can use 1/2″ or 3/4″ plywood and lumber for the sides too.
- Base – 1/2″ or 3/4″ thick plywood, cut to size for your space
- Sides – I used a thin T&G Wall Plank, like this one at Lowe’s
- Wood Glue, Wood Filler, 120-grit Sandpaper and Brad Nails
- Tools – Brad Nailer or hammer, and a Miter Saw or Circular Saw or Jigsaw
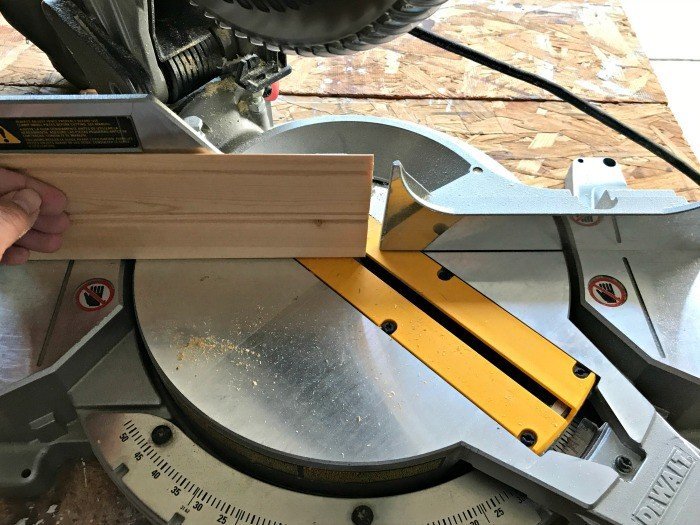
Step One – Cut Your Pieces
Cut the base of the box to size, remember to subtract out the width of the sides. Because my base is small, I was able to cut mine with just a Miter Saw. You could also use a Circular Saw or Jigsaw.
Cut the sides to size, make sure the ends are cut with a 45-degree angle on your Miter Saw.
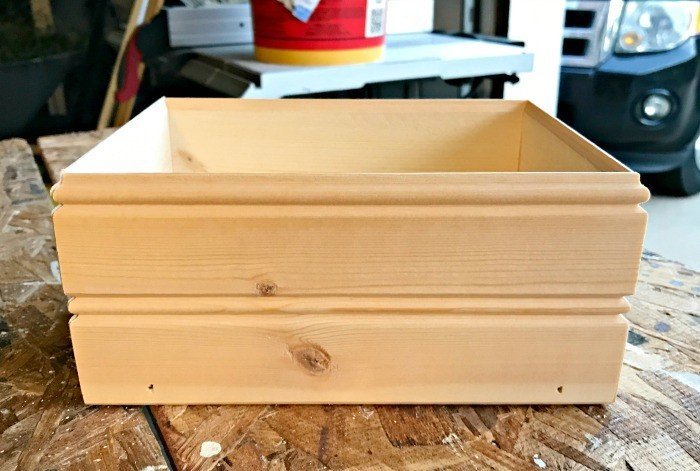
Step Two – Assemble The DIY Lazy Susan Box
Glue and nail each side to the base piece. Be sure to line up those corners carefully. Wipe excess glue away with a damp cloth.
If necessary, you can use painters tape on the top corners to keep the pieces straight while the glue dries. After the glue dries, apply wood filler to the corners and nail holes to get the smoothest look possible.
Once the filler dries, lightly sand the outside and inside with the sandpaper. Then clean the sawdust off with a tack cloth or lightly damp cloth.
Step Three – Apply Your Finish
After building your box, apply whatever paint, stain, or top coat you prefer. I used Varathane Fast Drying Stain in Weathered Gray on the outside of my box. And, blue acrylic paint on the inside.
I finished that off with 2 coats of Polycrylic to protect the box from food and oils. I used Minwax Polycrylic in Clear Matte.
That’s it for building a DIY lazy Susan box. Now, let’s get to adding the lazy Susan hardware that turns it into a DIY lazy Susan spice rack, or whichever type of organizer you need.
Making A DIY Lazy Susan Organizer
Supplies
- 4″ Lazy Susan Hardware
- Piece of 1/4″ or 1/2″ MDF or plywood cut to size. This will be the base of the Lazy Susan.
- Super Glue or screws and screwdriver
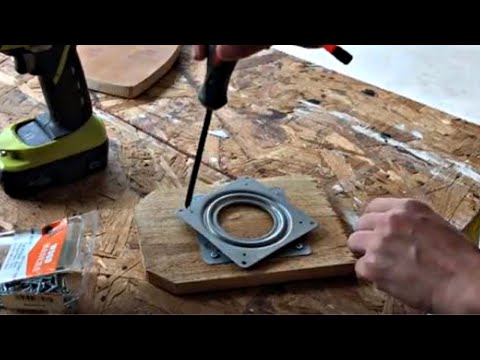
How To Use Lazy Susan Hardware
Lazy Susan hardware looks kind of complicated to use. Here’s 2 simple ways to use it.
- INSTALL USING SUPER GLUE: I used 1/8″ thick plywood for the base of my Lazy Susan Hardware. Since most screws would have been too long, I decided to try my trusty DAP Rapid Fuse instead. It’s a super glue that works on wood, steel, and lots of other surfaces. It worked great! BUT BE CAREFUL, screws can be undone. Glue can’t, at least not easily. So, test everything before gluing. Be sure that the box will spin in it’s space on top of that hardware and the base piece of wood before gluing.
- INSTALL USING SCREWS: Watch the video below to see the standard way to install Lazy Susan hardware with screws.
That’s it for this lazy Susan organizer DIY. Good luck with your project!
More DIY Projects For You
- How To Clean Kitchen Cabinets: 3 Best & 3 Bad Cleaners For Cabinets
- 30 Things To Deep Clean Before Guests Arrive (With Printable Checklist)
- Cheap And Easy DIY Canvas Frame (Quick Steps And Video)
- 14 Best Ways To Make Your Ugly House Look Good On A Budget!
- 20 Cheap Ceiling Ideas That Look Beautiful – From Amazon
Looking for more cute and crafty decor? Try this Easy DIY Wood Picture Frame With Trim Molding.
Or, have a look at this Easy Wood Slice Wall Hook DIY.
Feeling inspired? Get out there and make your own DIY Lazy Susan Organizer. Have fun and let me know if you have questions. Don’t forget to sign up for the Abbotts At Home email newsletter to get DIY, Remodeling, and Crafty ideas in your inbox.

Stephanie Abbott has been remodeling homes, updating & building furniture, and working on DIY home maintenance and cleaning tips for over 20 years. Her remodeling has been featured in Better Homes and Gardens Magazine. And, her DIY YouTube channel has had more than 8 million views.
Most of the DIY tutorials and videos on this site focus on beginner to intermediate level DIY Projects that can be done in an affordable way without high-end, expensive tools. All of the cleaning tips on this website have been tested in her home.