
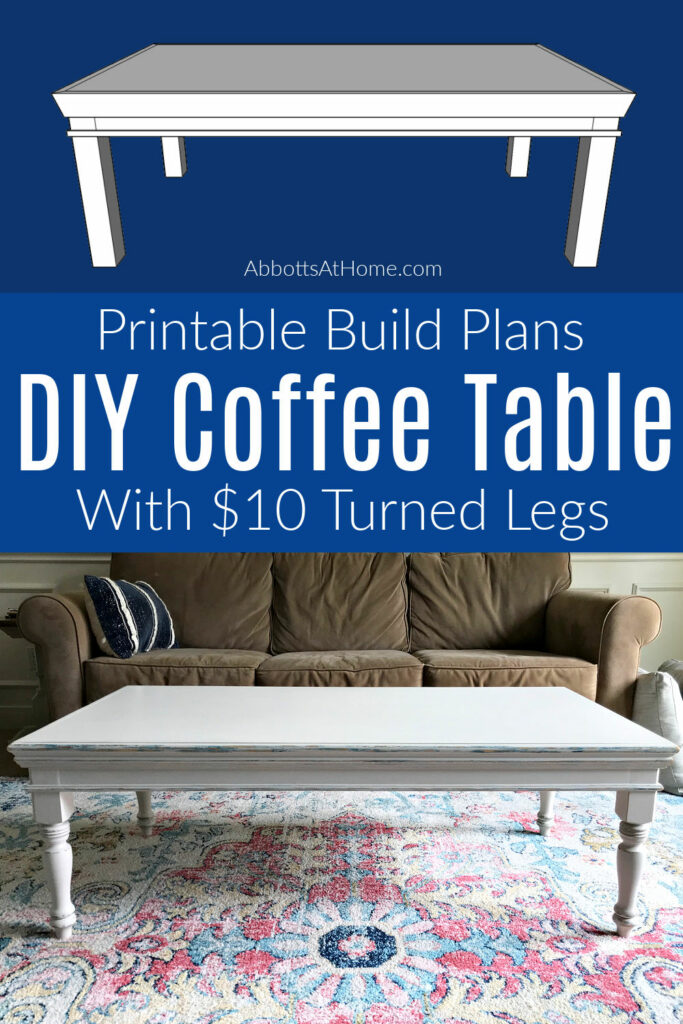
I LOVE the beautiful details on this easy and budget-friendly DIY Coffee Table Build Plan. Built with $10 Turned Legs, Molding & Plywood.
DIY Coffee Table Build Plans
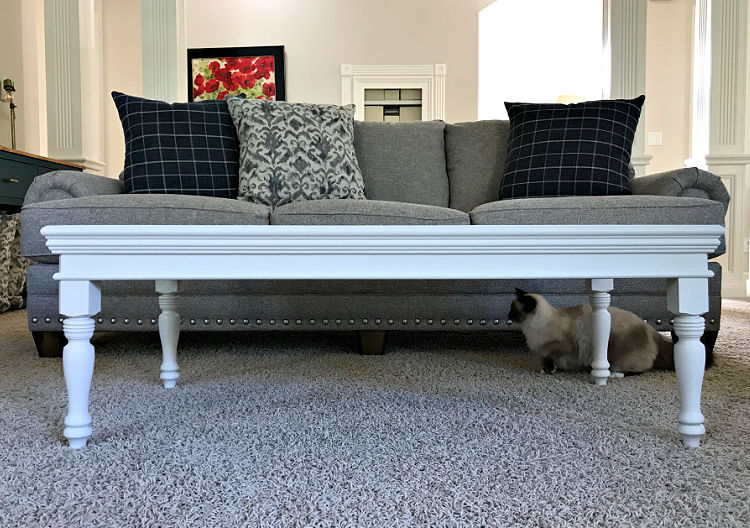
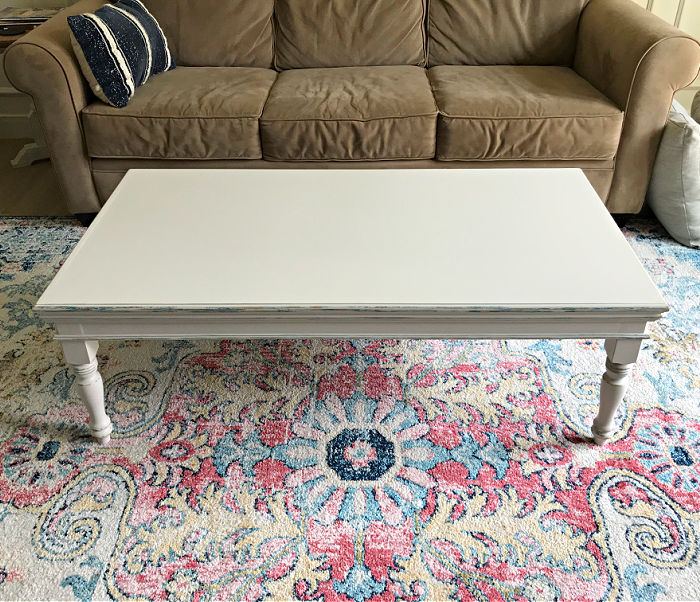
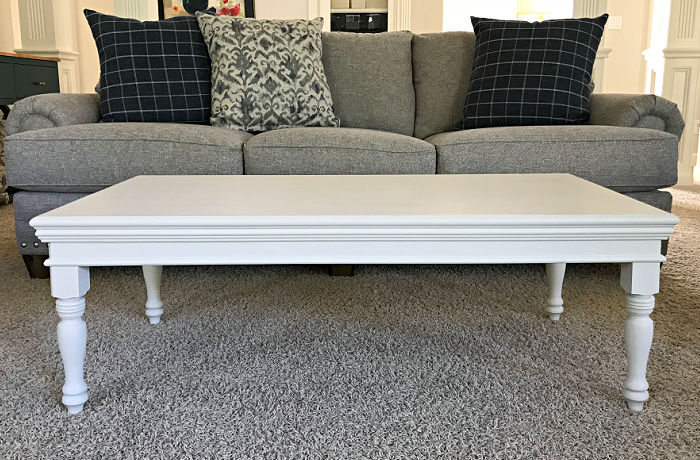
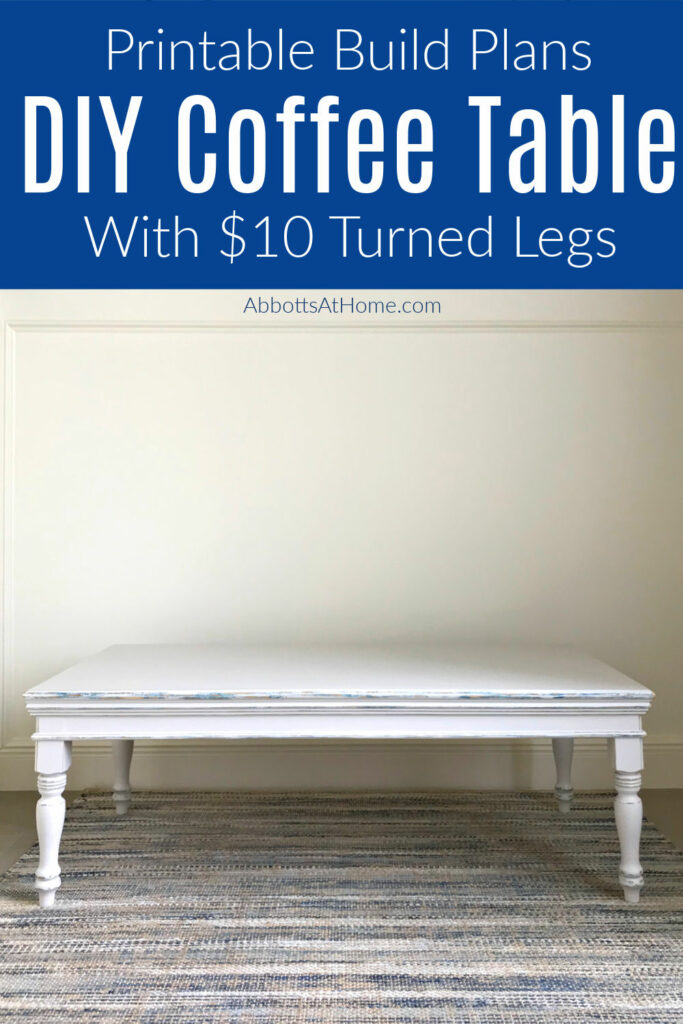
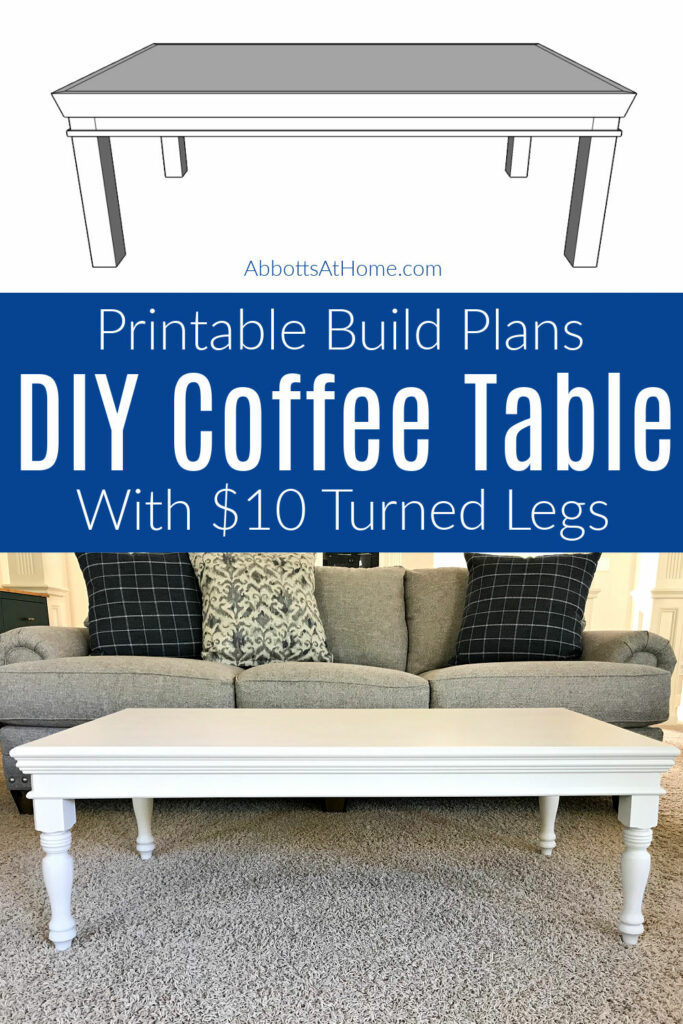
I’m loving this Coffee Table, guys! The big Chair Rail molding wrapped around the top of this coffee table and the smaller detail molding wrapped around a few inches below adds beautiful curves and details to this table.
And, all of that molding with the beautiful details on the turned legs makes this DIY coffee table look like my favorite coffee tables at high end furniture stores.
But, you can build this table for less than $150 in just a few hours. Yay!
Coffee Table Details
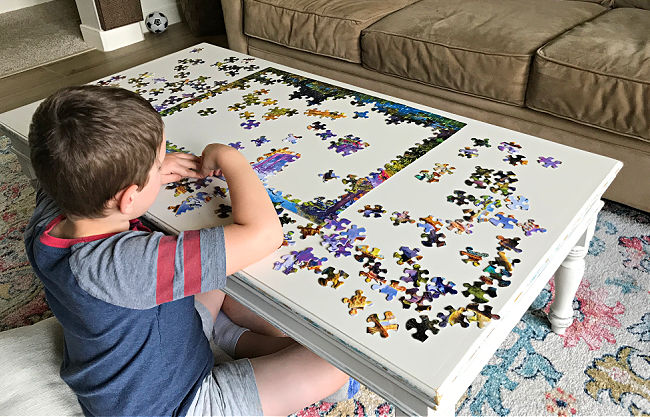
This big, beautiful coffee table fits in perfectly in that Family Game Room I’ve been remodeling for a few months now. This coffee table is 17 1/2″ high, which makes it the perfect height for most couches. It’s 49 1/2″ long and 25 1/2″ wide.
That makes this wood coffee table a nice, big table for playing board games or doing puzzles on. Which is exactly what we needed in this Family Room.
Since the big built in bookshelves I just painted are already stuffed full of board games and tons of puzzles.
When I designed this DIY Coffee Table Build Plan, I wanted to make sure this table would be extra sturdy too. I knew we’d be putting our feet up on this coffee table and even sitting on it sometimes.
So, it’s a strong, sturdy build!
And, I’m a huge fan of DIY molding projects. I’m always adding molding to my furniture, walls, and even my ceilings.
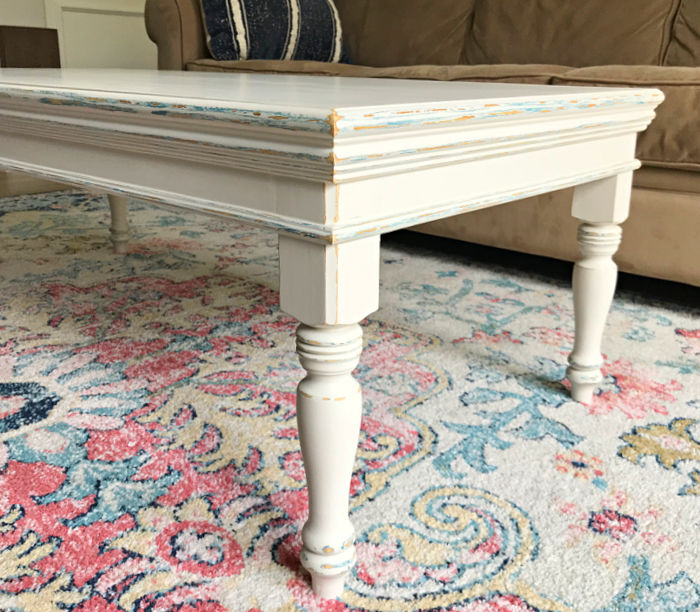
I ended up highlighting that molding with a DIY White and Blue Distressed Chalk Paint Look. But, it would look great with any stain or paint.
If you’d rather buy instead of build, check out my big list of the Best Amazon Coffee Tables for any Living Room.
DIY Coffee Table Build Plan Overview Video
Watch this video to get a good look at how I built this Coffee Table with 1/2″ plywood and brad nails INSTEAD of the Kreg Jig and 3/4″ plywood.
You can find instructions to do this build both ways in the printable plans.
Hello, DIY friends! You can find the DIY Coffee Table Build Plans at a great low price here. These plans are for personal use only. They cannot be shared or sold without my permission. Please let me know if you have any questions and enjoy your build! 🙂
The printable plans include Full Steps and Measurements, 3D Drawings, Cutting Guide, and Materials List for 2 ways to build this coffee table – using 1/2″ plywood or 3/4″ plywood.

Why Do The Build Plans Include 2 Sets of Instructions for the Same Build?
Typically, I only provide 1 set of instructions for building each of my furniture plans.
But, when I designed this DIY coffee table build plan I decided I wanted to use ½” plywood because I had so much leftover from building my new built ins.
And I knew I was painting my coffee table. So, I wasn’t worried about filling nail holes. With the ½” plywood option I build using wood blocks, wood trim, a lot of wood glue, and brad nails to build a strong table.
I know most of you are probably building with Kreg Jig Pocket Holes, so I wanted to include a Kreg Jig Joinery option for building this wood coffee table with ¾” thick plywood too.
You can see the steps for using the pocket holes to build this DIY Coffee Table below.
What You Need To Build This Coffee Table
As of May 2021, buying the lumber, molding, and legs costs about $150 in Texas. You can spend about $15 extra to buy a whole 4’x8’ sheet of plywood instead of 2 – 2’x4’.
That’s a better deal in the long run, if you always need more plywood for woodworking projects anyway, like me.
Tools Needed
- Miter Saw
- Circular Saw, with straight-edge cutting guide (if available)
- Kreg Jig & Screws
- Brad Nails & Nail Gun (I like this one)
- Wood Glue, Sandpaper or Sanding Blocks, Wood Glue
Materials Needed
- 2 – 2’x4’x3/4″ Thick Cabinet Grade Plywood
- 2 – 8′ Long 2 1/8″ Chair Rail or similar
- 2 – 8′ Long 11/16″ Base Cap Molding or similar
- 4 Small Table Legs between 15″ and 16″ High
Quick Note About Table Legs – I used the 15 ¼” high legs from Home Depot. You can find a similar leg at Lowe’s that’s only 15″ high. And, Amazon has a nice 16” high leg.
Table legs vary in height and width. You’ll have to adjust the apron length (distance between legs) and maybe the height of the blocks on top of the legs based on what size and style you use.
Coffee Tables should generally be between 16” and 18” high to be a comfortable height for use with most couches and chairs. You want the table top to be an inch or so below the seat of the couch.
DIY Coffee Table Build Plans – Steps to Build
Quick Step Guide
- Build Up The Leg Height
- Measure & Cut Aprons
- Mark & Drill Pocket Holes
- Build Frame
- Attach Table Top
- Add 2 Rows of Trim
- Wood Fill, Sand, and Finish
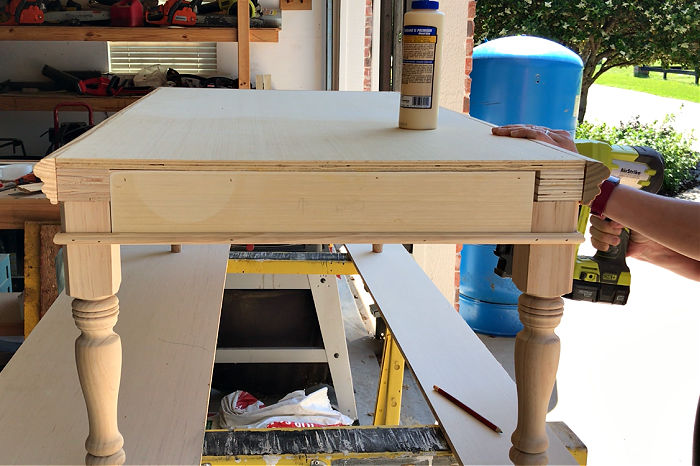
Step One
Remove the Hanger Bolt from each leg. A good pair of pliers will help you unscrew them. You can see me do this in the video for this build.
Next, use a stop block on your Miter Saw to cut 1/8” of the top off each leg. This will make the top square with the sides Then cut 2 – ¾” thick blocks to add height to the top of each leg. I used scrap plywood, but scrap 1x lumber would work too.
You’ll have to measure your legs to get the correct width for your blocks. Attach each block to the leg with wood glue and 1 ¼” or 1 ½” brad nails. Make sure that the blocks do not overhang the legs. That could get in the way of the aprons.
And, you want the blocks flush with the 2 outside corners of the legs so that the Chair Rail Molding has a nice, flat surface to attach to. Be sure to always wipe away excess wood glue with a damp cloth as you build this Coffee Table.
Step Two
Now that all 4 legs have the extra 1 ½” of height added on top, you can cut the aprons. I cut strips of 3/4” plywood with my circular saw and a straight edge cutting guide. Then I cut the strips to length with my Miter Saw.
The outside edge of the coffee table will be wrapped with molding, twice. So, the outside corners of the legs need to be flush with the edge of the plywood top. So that the molding will lay flat against the top and legs.
You should measure the length of the side of the table top then subtract the width of the legs to cut your aprons. The width of your legs or the length of your table top may be slightly different than mine.
IF YOU HAVE A ROUTER, you can always make your frame ¼” or so smaller than the table top. Then use a flush trim router bit to cut the table top to size after attaching the table top to the frame.
That’s the easiest way to make sure your table top and frame are perfectly flush along all 4 sides, before attaching the molding.
Step Three
Before connecting the legs with the aprons, be sure that the wood glue connecting the table legs to the blocks on top of them has had time to dry.
If one of the screws connecting the aprons to the legs hits between the blocks, it could separate the blocks, if the glue hasn’t dried.
Put 2 pocket holes on the end of each apron. It’d be best if the top pocket hole hits the middle of the block directly on top of the leg. And, the lower pocket hole connects directly to the leg. So line up the apron with the legs to mark where to drill the pocket holes.
BEFORE connecting the apron to the legs, drill the pocket holes on the aprons that will connect the frame to the table top. I put 3 pocket holes on each shorter apron and 5 on the 2 longer aprons.
Use wood glue and screws to attach the 4 aprons to the 4 legs. I usually connect the legs to the shorter aprons first. Then I connect the 2 short sides with the long aprons last.
The fully connected shorter table sides are easier to hold in place when connecting them together than longer sides can be. The legs I used have 1 chamfer corner. If you’re using those, make sure that chamfer corner is the outside corner of the table frame.
Step Four
Once the DIY Coffee Table frame is complete, you can connect the frame to the table top. This is easier to do if you flip the table top and frame upside down. Use wood glue and screws to connect the frame to the table top.
Make sure that the table top is lined up perfectly with the frame as you work.
I mentioned this in step two, but it’s worth mentioning again. Using a flush trim router bit to trim a slightly longer table top would be the easiest way to ensure that the table top and frame are flush along all 4 sides.
Step Five
Now that the legs, aprons and table top are all connected. It’s time to wrap the coffee table in 2 rows of molding.
Wrap the top edge of the table top in the larger Chair Rail Molding. This will cover those wood blocks we used to add height to the legs.
The top of the molding should be flush with the top of the table. Use 45-degree cuts on the corners. Brad nail from one corner across the molding to the next corner, carefully lining up the molding with the top as you go. You can see me doing this in the video too.
You’ll need to use 1 ½” brad nails for this molding. Only nail the molding in along the top so that the nails don’t come out through the back of the apron.
Step Six
Next, wrap the bottom edge of the apron in the smaller End Cap Molding. The bottom edge of this molding should be flush with the bottom edge of the apron. Use 45-degree cuts on the corners.
Brad nail from one corner across the molding to the next corner, carefully lining up the molding with the bottom as you go. You’ll need to use wood glue with 1” brad nails for this molding.
Step Seven
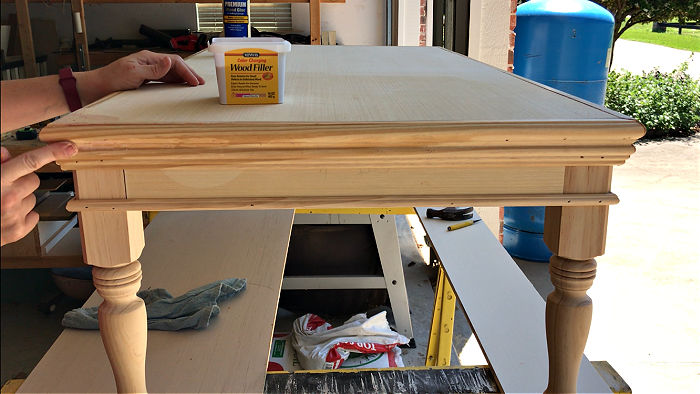
After finishing up with the molding, it’s time to fill any visible brad nail holes with wood filler. I also filled the lines between the apron and molding, apron and table top, and where the molding meets at the corners with wood filler.
Once the wood filler completely dries, sand the table smooth with 150 grit sandpaper. If any spots need a second layer of wood filler, repeat this step.
That’s it! You’ve finished this DIY Coffee Table Build Plans. Step back and admire your amazing talent and beautiful new coffee table. 😉
You can see the steps for the DIY Distressed White and Blue Chalk Paint Look I used on this table in my last post. You can grab the printable build plans with 3D Drawings and all of the measurements below.
Hello, DIY friends! You can find the DIY Coffee Table Build Plans at a great low price here. These plans are for personal use only. They cannot be shared or sold without my permission. Please let me know if you have any questions and enjoy your build! 🙂
The printable plans include Full Steps and Measurements, 3D Drawings, Cutting Guide, and Materials List for 2 ways to build this coffee table – using 1/2″ plywood or 3/4″ plywood.
Don’t forget to follow my channel on YouTube to see my latest DIY woodworking, home decor, and home maintenance projects. You can always ask questions there, if you need extra help. 🙂
How about another DIY Furniture Build Plan? Check out the large DIY Toy Box Build Plans that can also be used as a great Storage Chest Coffee Table too.

And, I love this DIY Console Table with Drawers!
Or this beautiful, large L-Shaped Bench for your backyard.
And, this DIY Table Over Washer and Dryer is always popular.

If you need a great little desk for your elementary age kids. Check out this DIY Childrens Desk with Storage Drawers.
Feeling inspired? Get out there and build your own with these DIY Coffee Table Build Plans. Follow the links above to get the things you’ll need.
Have fun and let me know if you have questions. Or post pictures of your work and tag Abbotts At Home on FB, I’d love to see it!

Stephanie Abbott has been remodeling homes, updating & building furniture, and working on DIY home maintenance and cleaning tips for over 20 years. Her remodeling has been featured in Better Homes and Gardens Magazine. And, her DIY YouTube channel has had more than 8 million views.
Most of the DIY tutorials and videos on this site focus on beginner to intermediate level DIY Projects that can be done in an affordable way without high-end, expensive tools. All of the cleaning tips on this website have been tested in her home.